Textiles
Weaving
Research on Weaving

Experiment


Materials needed:
1. Knitting yarns (assortment of colors and sizes)
2. Trimming, such as lace, ribbons, and cords
3. Fabric scissors
4. A3 photocopy papers, 5 pcs
5. Beads
6. Fork
7. Loom
8. Shuttles
9. Clamps
10. Reed
11. Long Table

Collaboration Group to Create Artifact by Weaving
*A collaborative work with Celia, Tongxin Wang, and Nanda*
Steps:
As this is a group project, we must work together in order to weave together. It is all started with choosing the right color, the type of yarns, and also beads that we're going to use based on our theme. For preparing the warp for weaving, we choose white color as it is a natural color and we think that it is best to be combined with other pastel colors that we have.


For preparing the warp, we must measure first on how long our artifact would be and then place the warping peg from the back warp stick on the loom. Before that, we make sure that the back rail of the loom is already clamped to a table by insert the clamp into the centre hole on the back rail.


After that, we thread the warp by putting the threading hook through the first slot, catch the yarn with the hook, pull a loop through the slot one by one and loop it over onto the warping peg. When it has already reached the warps' width, we then wind the back handle towards us and also inserted a cardboard warp stick or piece of paper the full width of the back roller so that the yarns will not be overlapping to one another.
We then need to take one thread from the first slot using the threading hook, pulling thread through the eye to the right of the slot, until across all slots. Then, we separate them into 6 groups and tie around the top of the group in a flat SINGLE knot, Tie the width of the warp in the same way.


For doing a basic weave, wind the weft yarn onto the shuttle. Put the reed into the down weaving position and pass the shuttle through the shed. Use the reed to gently push the first row of weaving down to the scrap yarn. While doing so, make sure that all weft have gone passed through each warp. Before continuing the other weft, make sure that there is no gap in between, so that the weave is secured and tight.
Throughout the process, I learned that for doing weaving we discovered that using fork was very convenient to push all the yarn so that there will be no gap in between. Actually, there was also some hook for us to push the yarn, but using fork is more time efficient because we can just push and pull several rows of it at just one go.
Final Outcome:


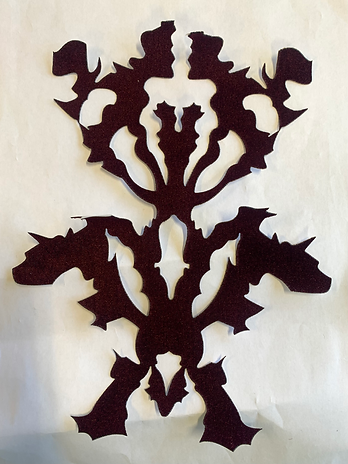
This is our artifact for our our collaboration project. The river served as the main source of inspiration for our overall design. We want to create a weaving out of strands that reflects toward a ribbon-like of water that will flow due to gravity, much like the river. Because we want to explain and visualize what a wave should look like, some of our weft was not entirely woven into the warp. To be more specific, we also considered utilizing yarns of varying densities to reflect the variety of materials and composition along the river. As depicted by the gradient color yarns, the wave's solution and any other minerals transported by the water are present. As you can see from the color, we choose yellow to contrast and emphasize how a river is typically located in an area where people could find happiness. People may sit there and enjoy the view of the flowing water while also watching the sun set.
With the variations of different thickness and shade of colours, this particular scarf is meant to be worn for warming the wearer's body.
Reflection in group project
- The benefit of doing group work
This was our first group project in fashion domain. Usually, we have group project assigned for us during the design thinking class, and the terms of craftmanship there may be different than fashion as we were came from different interest and skill together. This time, for weaving, we chose the group ourselves and I think it was very much beneficial for us to do it together in group rather than individual. The reason why is because weaving requires a lot of time to really construct all of the yarns together, that can be very tiring for just a person to finish it, depending on the length of the warp. Because we did everything in group, it then really help us to use our time and energy to finish this task efficiently. During the warp-threading, especially, it really need a coordination between the group team together, as one person may insert the yarn onto the loom, and another person to wrap it around the clamp.
- During the process of weaving (negotiation and contribution)
For this group project, I think great communication between each of us on how we divide our contribution really help us to construct the final result. We divide our contribution by making goals of continuing each other's work every an hour for each day, because we may not finish everything together at one sitting. However, It might not really work well at first but as the days just passed by, it was really efficient for us to use this term to finish our weaving.
Also, at first we talked about our concept and color palette together. Unfortunately, all members could not attend together during buying the yarns that we were about to use. So, we must conduct everything online (one member took picture of it and the rest discuss it on our group chat). Even though that it sounds crucial, but we managed to do it together and bought all yarns that we agreed to use for this project.
- Coordination for constructing the design
We already had our vision and concluded the story and meaning behind our weaving which then help us to cope to finish all scarf from the start to end by dividing our job contribution. Meaning that sometimes we finish our task alone without other's accompaniment.
Because we did the weaving in the middle of preparing our project in the design studio, sometimes there were also times when our member were not able to do their task. However, because of a good communication that we always maintain, those member would inform the rest and the others will also continue it. I think throughout the process of finishing this scarf we never encountered any problem at all.
- Overall impression of doing group work
To conclude all experience that I have during the process, I really enjoy doing weaving as a group. Because, I believe that when several different creativity, style, and skill combined together, it can really lead to something that is exceptional, or even innovation that I may not think of when work as individual. For instance, there were some part of the weaving whereby the yarns were not really weaved thoroughly to all warp, as we brainstormed together to think abscout how might we create a new illusion by using different method of weaving. Things like adding an idea towards another because of the different creativity and style that we have, really help us to improve more on our scarf. As the weaving process went along, the pattern that we made even more expanded and reached to create different pattern than the previous one.
- How could I improve for the next group project during this semester?
I always think that in order to create a great and excellent group work is only about the communication. Turns out, that I was wrong. There are much more to explore and applied when is working together with others as a group. An example of it is the same goal and same concept that we were trying to aim together, after clear discussion. Deciding and holding on to the same goal and concept together is really important in group work so that we can always refer to it as we go working through it and have a more efficient and effective time and keeping everyone aligned.
Screen Printing
Research on Screen Print


Persona Moodboard and Colour Research

For screen printing, I used my persona as my reference. Here is the moodboard for me to hold on to, as the source of visualizing their preference. For this project, my user/ persona is a student who is studying for graphic design but also has strong passion for fashion. She is a young, passionate, 19 years old girl who is interested in make up. She believe that a face is a canvas that everyone has to communicate their ideas and create artwork. Since she pursue herself to work at an art and design industry she is very well aware of what the current trend is, including the colour. Which is why, for the colour of the screen print is based on the recent runway, Spring Summer 2023.


Screen Print Sketches

For screen printing, I choose several objects which are related to my persona's interest. My persona is someone who is a designer and currently studying overseas, making social media as platform of expression. Here, are 5 objects that they think is important and plays big roles on their life:
1
Lipstick, Eyes, and Mouth
In one of interviews with my persona, she thinks that eyes and mouth are the most attractive features on her faces that then need to be emphasized the most while is applying on make up. Which is why, I also exaggerate the eyeliner and draw lipstick that then create "nose" shape between the eyes and mouth
2
Make up Brush
As my persona is a girl, she thinks that make up is more important rather than hairstyles. Knowing this in mind, I tried to draw a thing which will really help them the most while doing make up, which is brushes. Here, I drew 2 brushes for blushes and also contour since they are also the most 2 used make up product other than lipstick and eyeshadow
3
Bag / Purse with Print Pattern on it
When asking about the most important artifact/ fashion object, one of them mentioned bag. The reason why is because with bag, she can keep all of her belongings together- to keep all of her weapon. She said that even one bag can contains several objects that she needs on daily basis like basic make up products, umbrella, sunglasses, ID card, wallet, and handphone.
After that, I further think about how to make "bag" or "purses" interesting for prints. Then, I asked myself like "Why not create an object that contains of prints for screen printing?". The print that the bag have is actually based on the type of print that I had researched on further for what design student usually wear, which is one that looks like graffiti or animal print. This one, I choose zebra and then combined it with dots.
4
Shoes with Print Pattern on it
Other than bags, one of them also mentioned shoes. Then I also draw shoes that have prints on it to relate it with the previous object. Even though that most of design student also has dress code which restrict high heels, this time, I specifically choose heels because it symbolised high social stature, refined fashionable taste, military prowess, and femininity.
5
Money
Last, I also propose money which is being held by my "persona" with her rings and colored nails, as money is related to achievement and recognition, status and respect, control, and power, which are the characteristics that reflect to my persona. It is as if even that they are young and still studying about design and art, she is very hardworking and passionate about what they are trying to aim, which is a successful designer.
Final Sketches for Transparency and Screenprint:

Repeated Pattern

Single Pattern
*For repeated pattern we need to draw a crossed line on the corner of it to help us while printing, so that we can placed the print thoroughly after one to another*
Placement of Prints

Before doing the actual printing, I tried to play with the placement of prints by still maintaining the ratio of the placement and single prints together. Here I also try to play with directions, colors, and layering.
Screen Printing
Materials needed:
1. Silkscreen frame in 2 A3 size that are already stretched with organza
2. Transparencies of finalized screen print designs
(each print design, 2 layers of transparencies)
3. Transparent scotch tape
4. Masking tape
5. Paper scissors
6. Apron and used towel
7. Different types of binders (translucent,
semi-opaque, opaque) and color pigments
8. Squeegee
9. Plastic containers with covers
10. Plastic spoons
11. Different types of fabric
12. Fabric scissors
13. Hair dryer


Steps:
Preparation of Silkscreen Print Frame


First of all, we need to prepare the frame by using coater. This time, we need to be careful to make sure that the liquid is paste thoroughly by holding the whole frame and placed our finger on the wooden frame. After that, we place the frame to dry
As we were aiming to make the transparency of finalized pattern to be as black as possible, we need to print them twice and make sure that they are layered together perfectly. I did it by checking them with light in the background, then put it on top of a blank paper (as you can see from the video). Then, I secured them by taping them with invisible tape.

We then taped the transparent print according to how we aim for the outcome arrangement of print and exposed it onto the UV.


After waiting for several minutes then we spray our frame with water, focusing more on the thinest line to the thickest, and dry it with hair dryer.
For the final preparation of the frame, we also need to put some masking tape on the border of the frame, and the + marking on the repeated pattern, so that later it will not be exposed while printing on the fabric

Other than preparing the frame, mixing colors will also play big roles on the outcome of the prints. Here, I tried to mix several color as the ones that I already made as the color palette. As some of the fabric that I will use for print is different, I also mix the color with different binders, started from the translucent, semi opaque, and opaque, with consideration of the saturation and tones for the color that I aimed to create.
Experiment:
1
Repeated Pattern Combined with Single (1)


This was my very first try for doing repeated prints. I used the + sign that is been covered with tape as my guide to paste it to the next pattern. For doing silk printing, I should have let the color binder on the previous paint to dry first on the fabric, and then continue to paste it on the other section. As I did not do it, then the previous paint resulted to stay on the block print and make the next print to have the remained print.
I just realize that it stay on the block after finish pasting all the pattern, which is why the very print was very messy
Final Outcome:

Medium :
Size : A2
Fabric : Polyester
This is the result of combining the repeated print and single prints together. I used an A2 size fabric because my repeated block is in A4 size and using an A3 size fabric may not be best to really shown the repeated pattern together. I think for the placement of it was a success, because all of them is paralleled with one another as I cautiously paste the block with the guide of "+ sign" on my block.
As for the placement of the single prints, I just pasted them at the top of the repeated with more unstructured angle using different colors that is not as "bold" as the repeated ones with the intention to still making the repeated patterns as the highlight. But, after looking at the overall results of it, I feel like I did too much of overlapping, that can make the viewer to feel confuse on where to look at.


From this first experiment even though that the repeated print was neatly paste, I had not really discovered on the reason why the resulting prints has some kind of "blurry" colour outside of the shape. But it was actually occurred because I did not let the print to be dried first before printing. Then, to make it better, I intentionally fixed it by covering it with the single prints so that it will not show the mistake that I did for repeated ones.
2
Repeated Pattern Combined with Single (2)


Attempting to do another repeated combined with single patterns, this time, I want to explore more on how I could play with repeated terms, by making them to have more "free" angle, in 45 degree started from the top edge to the other end of the fabric. During the process, I find it really hard to make the patterns to be perfectly paralleled with one another and a bit confuse on how I should paste it together because the fabric itself has details on the warp which influenced and affected me on making the angle to be constant.
Final Outcome:

Medium :
Size : A2
Fabric : Cotton Corduroy
I considered this print as failed one because there were so many prints leaking on the fabric that is not intentional as I was rushing a bit during the process. Different than the previous attempt, this time, I tried to purposely make layered single print by using different color to give some illusion of shadowing effect to enhance more details on the fabric.

As I already mentioned, I was a bit in a rush on the process of finishing this print, which is why some part of the prints are not even pasted thoroughly. Thinking that pasting it once more on top of it could make it better, it actually even worsen the prints (the yellow repeated prints). The reason why, is because when I printed them again, the placement of it was not precisely on top of the print, that then make the print looks as if it is glitched. Then, in order to fix it I added another layer of single prints on top of it to cover it.
While printing this particular piece, I realized that the prints has different results on the intensity of the color. For instance, the yellow print has less opacity compared to the green or pink print. Indeed, because I used different types of binder in order to create the shade of colors which sometimes could affect the resulted opacity while being paste on different types of fabric. As this is a dense and thick type of fabric, I should have created and mixed the color by with the opaque binder, so that the color will meticulously pasted on the fabric.
3
Repeated Pattern Combined with Single (3)


This time, I tried to paste the single print first and let the repeated pattern to fill up the blank space of fabric, following several exercise of placement that I already did before doing the prints. Also, I intentionally overlapped the different prints together while making use of the different shade of color.

Again, I should have made the same colour, but using different types of binder depending on the type of fabric that I used for prints. As you can see, the pink color that have good intensity for the previous print that is pasted on a thick fabric, does not really paste perfectly on this light fabric. Some part of the print is even "melted" and make the prints to look very messy. Trying to fix it, I tried different method by iron it from the wrong side of it, having the expectation for it to be not look as "melted" then. (The picture on the left was before the ironing, and the right is after).The result is not very much different, but it did help a little bit for decreasing the smudge.
Final Outcome:

Medium :
Size : A2
Fabric : Polyester
Lining
For this print, I really enjoy the process of playing and experimenting on the repeated pattern and making use of the different color to help me decided on where and how I placed the angle of it. However, this print may not be as neat as the other prints that I already experimented before as several color of the binder has dropped on the area of the print. While doing this print, I discovered that other than mixing the color and choosing the right binder, the placement of the print is also important. For instance, even though that there were some mess on printing the block, the angle and placement of different prints that are vary, the viewer may not be focus on the messiness of the color binder, but rater more on how the prints were all coordinated freely.
4
Single Pattern (1)

Obviously, for playing with single prints pattern, I did not really have to think much about the placement of it as it does not have any necessary rule on where it should be placed. For first experiment, I still used some overlapping method while using different colours. The picture above, was the first draft on how I would consider this piece as final, since the instruction was just to make print based on the single pattern that I created. Then, I thought, why did not I also combine it with "some" of the pattern from repeated ones?
Final Outcome:

Medium :
Size : A3
Fabric : Gabardine
As the final finishing for this piece, I pasted a part of my repeated patterns, which is the lips with contrasting shade of color (shocking pink that is mixed with opaque binder), so that it can also enhance the overall result of the prints. Here, I intentionally placed them to fill up the "blank" space on the print and also to cover some part of the print that was not neatly pasted on the process of printing.

This was how the fabric looked like after I did the print and ironed them together to set the color. It has some textures, looking like an embossed fabric. As for the other piece, it does not really have this finishing, and I think that this happened because this fabric is gabardine.


For the colour, I actually experimented on doing some gradient effect, mixing two different shades of color together to enhance and add different details on the prints. Personally, it was okay but I don't think that it will really suit the theme, so I did not continue to do it for the other piece.
On this piece, I also learned to constantly wash the block after using it for several times, so that the color binder will not stick onto the board and clogged the next print.
5
Single Pattern (2)

Medium :
Size : A3
Fabric : Cotton
This time I tried to challenge myself by using different thickness, textured, and colored fabric. At first I was so afraid because I really need to be cautious to choose the color to put and mixed on top of this fabric. Then, I made another color that is also have the similar shade of the fabric (the soft pink color), but the result was not really nice as the prints cannot really shown. However, as I already print it, I could not just stop using the color and then continue to develop it. So, I tried to make the finishing result better by printing another repeated pattern to balance it. On this piece, I also added the "eye" print just because this print has more blank space and using just one pattern may resulted the print to look very common and usual.


Same as the previous attempt even though I used the same shade of color and binder, there was some different result of the prints that happened because I did not wash it after several use. Admittedly, I should have create the other "smudged and wrong" method of print on the other side of the print to balance my mistake.
In this piece, I learned more about balancing and playing with shades of the color, to create more details on the prints to differ this piece than the others.
6
Single Pattern (3)
Medium :
Size : A3
Fabric : Polyester Silk
Final Outcome:


This was my last experiment on doing individual screen printing. This time, I did not really think about the placement and the angle of the prints that I used, which then I found beneficially make my prints to look different than the previous ones that I made. This time, I intentionally flip up my blocks and not paste them accordingly, rather more free, depending on the space that it has left on the fabric.
For this piece, I also tried to experiment on sheer fabric, which is satin, to test on whether or not it will affect the binder opacity and intensity, expecting the binder to be as sheer as the fabric. But, as a result, the fabric does not really influence the binder. But the binder itself, will always affect the result on the tidiness or the intensity of the color when is pasted on the fabric.
Reflection for doing silkscreen print
- Mixing colours using binder for printing
As for the beginning experiment, I did not really understand that the binder that I used will affect the quality of prints on the different thickness and sheer of fabric. I just focused on aiming the shade of colours as my colour palette. Comparing the experience of mixing colour towards the previous semester for what we did during shibori, mixing and creating colour using binder and the colour pigment was very easy. In order to create a pastel yellow shade, I just need to add more binder on the colour pigment together. However, different types of binding can not really give the same result as the other. For example, if I want to create a pastel shade of yellow using opaque binder, I may need to add more binding into it, resulting the whole pigment to be really thick.
- Sustainability aspect of doing the print
After doing the whole process of printing, I could say that silk screen printing is not really sustainable. Throughout the process of creating just one piece of prints, it may requires more than 5 liters of water, which produces wastewater. The reason why it needs a lot of water is because each prints has different colours and patterns and the block needs to be washed and dried beforehand to be used for pasting another prints. To be more effective, the designer/ artist should really made use of the block pattern with the same colour to be pasted on the other fabric, to create prints. However, they also need to be remembered that it can only be pasted for no more than 5 times, or else the binder will stuck inside the exposed pattern.
Also, by washing and washing the blocks, meaning that some of the blocks that still has binder can go to the water drain and create another problem which is clogging.
- Comparing the results with previous print that I did last semester
Comparing to previous semester's experiment of creating prints through exposure (cyanotype and pebeo setacolours), I personally preferred to do silk screen printing even though it takes more process and energy to do so. But, I think it is still more depending on the purpose and the motifs that we were trying to aim. While doing screen printing, although it needed to have more drying, washing, pasting process, and especially patience, the result can be controlled and really depend on the designer/artist's motifs of exposure. Whereas cyanotype and pebeo setacolours, can be more depending on the sunlight that the designer/artist may not be able to control
- How could I improve for the group project
On the technicality, I will really make sure that the binder that I use is depending more on the types of fabric that I will paste my print on, and not on the shade of colour that I will try to aim.
On the practicality, however, I should have been more patience while doing each processes together. For instance, waiting for the print blocks to dry. While doing the whole experiment, there were so many accidental drops of water or color pigment that was not intentional on the prints, resulting an imperfect point of creating prints. For the future collaboration, I will really need to make sure that the whole block and the pattern is already dry, so that the result of the prints can be really need and there will be no unintentionally mess on top of the prints.
Collaboration Group to Create Artifact with Different Screen Print Motifs
*A collaborative work with Madhushah, Regina Tan, and Nanda*


Before doing the actual printing, first, we made some discussion on what kind of artifact that we want to create. Then, we conclude to make a bustier together because it is one of the artifact that in function wise, can be worn for several times and be combined with different garment together. With that in mind, then we marked the pattern with tracing paper and tracing wheel, then plan on how we want to arrange the print on the latter.
For the arrangement itself, we tried to be more arranged and accordance for the side seam, but more free by applying overlapping method on the front and back details.
Throughout the process, we also divided our contribution together by:
- 2 people doing the printing
- 1 person drying the print
- 1 person washing the blocks, and drying the block afterwards
We successfully substituted these three working terms and managed our time well, finish and preparing the print for constructing the bustier in 4 hours class time.


Eyelet is the opening of this corset. And in the process of marking the holes, we were really careful because we want the final result to ensure a good fitting for model size
As for adding more details on the corset, we added ruffles that we intentionally measure the length to go around the hemline of the corset
For the hem, in order to attain a clean finish we use bias tape. With the inherent flexibility of bias tape, it enables us to sewn neatly around curves for smooth-pucker free look for the corset
Final Artefact: Bustier with Ruffles

Wearer's Right View

Front View

Back View

Wearer's Left View
Description of the Artifact:
This is a tight-fitting corset for model size with ruffles details on the hem that contains of several prints with the themes of : Futuristic, Expressionist Persona, Alice in Wonderland, and South-east Asia culture. The opening of this corset is at the back of the wearer using eyelet and orange ribbon, so that the wearer themselves can easily adjust the tightness of the corset.
This corset is also constructed with different thickness and types of fabric that then enhance the elements of the piece and purposely made to highlight each prints, related to the theme. Having some various themes contained along with the color that is related to each, this corset is perfect to be worn for attending day-event and can be layered with other garments such as jacket, coat, or tracksuits.
As this is a group project, the process of constructing them altogether were divided equally and we work together from drawing the pattern, engineering the print, mixing the color binder, and also sewing it.
Reflection in group project
- How we conclude to be the same group together, negotiation and resolution of issues regarding the design
The first time when the lecturer announced that this screenprint will also be conducted in groups, it was easy for us to gather together as we share almost similar concept and similar visual for our prints. For instance, Madhushah's theme is inspired by futurism, which is one of the art movements. On her block, it has one angle of a lady face, that goes along really well with my repeated pattern that is inspired by my persona that has pair of eyes and also lips. For Regina's block, it also compatible to be combined with Nanda's print, because hers has card pattern inspired by Alice in Wonderland that can be filled with Nanda's animal that represent zodiac sign.
After we conclude this group to work together, then we quickly discussed on what type of artifact that we were going to make. From the beginning, we both all agree to make a corset together. Eventually, since we already have the same vision for the outcome and willing to do together accordingly, it then makes our work is time efficient and consequently save more time.
- Group member's contribution
As for each member's contribution, we were pretty much working all at once and also assist each other out together. For example, two members would try to trace the front panel of the corset, and the rest will just trace the back panel of it. And since this method of distributing of group work really efficient for us, then on the practicality of printing the block, we also applied this term similarly by while one of us may print the screen, the other one may dry the previous frame, and the other two to create the ruffles embellishment together.
- Impression of doing screen print in group work
The one thing that I will never forget in this group is how we were genuinely collaborating and completing everything in a single day. Comparing group work to individual printing, I feel that silk screen printing in groups is much more enjoyable and less strenuous because we manage to complete every stage together and assist one another. While in individual project, I spent most of the time washing the block rather than printing on the fabric, keeping the block print to be dry, making sure that the print that I just printed is dry enough for me to continue to the next, and checking that all parts of the fabric was pasted flat on the table. Those were several responsibilities that I need to look after throughout every prints, to juggle and divide my focus to not only one print. However, in groups, we can be focusing at just one task that those person has to do at that time, one by one, so that the outcome of it will also be perfect because it was done carefully.
- How can I be better for future collaboration
If I were to produce an artifact in group again in the future, I would rather try to divide my mind and focus onto doing several things in one. I believe that a designer also has its consequence to also be able to mastering several skill together. And throughout the process, those different skills might be required to be utilised at one time. Even though that we may just focus on doing one thing when is working in group, there would also be a time when we also need to divide our thoughts on things that we cannot change, some alterations, or issue, since we used to work in groups; whereby things would not always go as planned. For example, we might wind up covering for our friends' other teammates even if the tasks were separated. So, we also find ourselves having to take care of ourselves and our friends and this is a point where a multitask ability is needed.
Engraving and Laser Cutting
Research on Laser Cutting

Engraving and Laser Cutting Sketches
1
Mad Expressionist

I ought to create face with several squiggles and lines that reflects on the anger of expressionist (my theme), representing the voice of teenage girls that is been under represented during the battle of sustainability.
Here, I was trying to emphasize the lips and the eye of the face, relating it towards my silk screen print motif. There are also other shapes surrounding the eyes and lips that is drawn intentionally to form a face feature (cheeks, forehead, and nose)
2
"What do you think about textile waste?"

For the WIP session last semester, I asked several of art students (my persona) to draw out how they feel towards textile waste. Some of them drew faces, expression, words, or even just squiggly line to express their frustration.
For this sketch, then I tried to combine them all by creating a symmetrical line that are connected to one another and some that just stand by themselves, showing how they can not really form any define shapes as how textile waste cannot be reduce if we do not work together.
3
Squiggly Dots
4
Your Lips

For this particular sketch that I drew, it does not really has meaning behind it but rather connected to my silk screen printing, which is the pattern that is drawn onto the heels, and purse of my persona.
In this case, however, I was thinking to combine the resulting piece of the prints together with the laser cut or engraving piece. But, for this sketch, the laser cut may not work really well together because the cut area is making the whole piece of fabric to be very fragile

While the other motifs that I drew is reflected only towards the feelings/emotions that my persona has, this time I was trying to draw out and emphasize more in the object and body parts that they find "powerful" to help them communicate and battle on the process of combatting sustainability.
For this particular motifs, as it have many details on it, it may not be suitable for laser cutting because the resulting fabric will be really fragile, so I intentionally draw them to be engraved.
5
Pattern from Collages (1)
6
Pattern from Collages (2)
Time-lapse video:
Time-lapse video:


Sketch:

Sketch:

Different than the other motifs that I drew, these two pieces are actually drawn based on several collages exercise that I made before sketching my collection of design studio, to discover the kind of design elements and silhouette that I would be using. The process of drawing it can be seen during the time-lapse video above each sketches.
As it has many details on the motifs, they also may not be suitable for laser cutting, but maybe using them as engraving in reversible manner (the black colored to be the engraved part) can be a better way to make the pattern.
7
Pattern from Collages (3)
Time-lapse video:
Sketch:


For this motif, I already planned it to be a piece for laser cutting. Here, I purposely made a lot of details of cutting on the edge of the piece and also several cuts in the middle of it, but still leaving more space of area fabric that is not cut to hold the whole piece stronger after cutting. I managed to got this motif from tracing the previous pattern that I made from the silhouette of collage.
Materials needed:
1. Motifs in Ai saved in thumbdrive
2. Adaptor
3. Synthetic fabrics in A4 size
Experiment on Engraving:
1
Mad Expressionist


As for engraving, I must transfer the sketch that I already drawn on procreate into AI file. Here, I redraw again the line and fill it up with black color. The whole process of engraving actually works from the very top of the design until the bottom and will only burn the surface of the black color fill of the file and it took for about 25 minutes in order to produce this engraving in A4 size fabric.

I intentionally choose a medium weight fabric that has short pile, so that I could see about how different the whole piece would look like after the surface was burnt. As you can see from the result, the burnt of the surface could really show, as it was then turned out to make the fabric to look a little bit translucent and thinner than the rest, also because of the "lost" of portion of pile, that make it really contrast than the actual fabric.
However, for this particular design, I think that reversing the black colour on the file (meaning that making the burnt surface to be the negative part of the sketch) will help to really show the overall shape of the engraved better. The reason why is because the whole design in AI did not really have much to be engraved on then it made the burnt surface to not really pop and noticeable.
2
Patterns from Collage (3)
Reverse colour motif:


Original engraved from motif:


After the first experiment, then I became curious on how a reverse design would look like in engraving. Which is why, then I made a pattern in AI that has the same design, but different cut on engraving.
Comparing the two pieces, then I realize that both of the engraved cut experiment are actually successful, but the overall shape and result will still depend on how the designer wants to communicate the meaning behind the pieces.
For instance, the result of reverse colour motif shows more of foggy and smoky personal atmosphere and might be best to be used for delivering a mysterious message that the designer wants to communicate. Because seeing it from afar, a person may not notice on what shape that the burnt creates at first glance. The original engraved motif, on the other hand, deliver the shapes better as it really makes the burning area to pop.
However, to relate on how this piece will relate to my design studio, the reverse motif really interpret the theme better. As my project is inspired by expressionist art movement, the engraved burnt of the whole piece does not really show the pattern or shape clearly. It will even make the viewer to start questioning and be best to translate them on their own, probably to even an unpredictable thoughts. Though for the second one, the result is very obvious, that makes it really predictable and become a very common and usual way to communicate an idea.
Observing the 3 results of engraving altogether, I realized that in order to better showing the shapes of the pattern, I should have drawn them bigger and with less details. Also, I learnt that thick fabric will really best to deliver the idea of engraving more, so that it will also show contrast on the pattern that is burnt.
Another experiment on reverse colour motif:

*This piece was unsuccessful because the machine was having a technical issue in the middle of the process*
As for the reverse motif, I also tried to engrave the same pattern on different types of fabric while also increase the power so that it will burn the fabric more. Here, the result of the burnt was not really shown, because the fabric has details on its patterns. I should have never used a fabric that has prints on top of it, or at least full covered pattern, so that the engraving part would be seen. However, if I were to really use those kind of fabric, the engrave burnt should not have many details, and give wider area to really display the burnt.
Experiment on Laser Cut:
1
Squiggly Dots


Almost the same as preparing engraving, I also need to transfer the sketch and motif to AI, and draw the cut portion in specifically RED line that have 0,001 thickness. Also, as you can see from the video, the laser cut process is much more faster compared to engraving, as it only cut the particular shape that I draw, and not necessarily will going through all lines.


This was my first time of doing laser cut and the piece is really flimsy and fragile which you can see on the video. I used the same fabric that I used for engraving, and I realized that with that many details on the cut, it will be better rather for this design to be used for engraving. If I were to still continue use this design for laser cutting, I should have drawn more space for the fabric to stay, and not leave too much for the cutting part, and also use stiffer fabric to not make it as fragile.
2
Mad Expressionist


Since I thought that Mad Expressionist was not really a success for engraving, I also tried it on laser cutting. Here, I also intentionally make some part of the face to be cut and not forming a shape (just a line), to look at the difference on what it will produce for laser cutting.


After looking at the result of this design on engraving and comparing it to the result of laser cut, I should have drawn more lines on the not cut area, so that the whole piece will not be really fragile. As the fabric of this piece is stiff and a bit heavy, when I take out the whole piece together, it was all drooping. So, in order to reduce the fragility of Mad Expressionist, I should had put a bonding paper on the back of it before sending it to laser cut and then after it was cut, I paste this piece to another layer of fabric so that the whole cut will still stand and stay on this piece.
3
Pattern from collages (3)

Learning from my mistake of several laser cut experiment, this time I intentionally aim to use all the cutting piece, different purpose than the previous ones where the cut area is meant to form a shape with the help of the other remaining fabric, visualising a definite shape of the object.
Here, you can see from the sketch that I also have details on cutouts on the cutting piece, but also enlarge the portion of the cut fabric so that it will still hold the overall piece together.

This is the result of my last piece of laser cut and the fabric is actually the same as for engraving (fabric that has pile). However, I also put a binding paper behind it so that it will later on can be sticked into another layer of fabric.


Other than the thick fabric, I also bind two colours of lightweight fabric together, with the intention to have it as two tone fabric and keep the translucent of the materials and making the whole piece to be stiffer. I cut it with the same pattern, as I was planning to combine the same previous cut with this one.
Also, as the terms of laser cutting is actually burning the fabric in a very thin, fine line to form a pattern based on our AI illustration, I realized that every edge of the cut piece will then not have any fray. As you can see, the fabric that I used above is organza, and usually they have the tendency to be fray while is cut. However, as they are being laser cut, the edge of the shape just stay there and left no thread coming out. This could be a way for us, designer, to prevent any frayness on our pattern and produce a clean finishing.
Combining the Laser cut for design studio:

As for my project, I tackled more on pleats embellishment and also ruffles. Here, I peeled the binding paper on the velvet fabric and iron them towards the pleat piece.

This was actually how I was planning to layer the laser cut together. I ought to sew it on top of it but not on the exact shape. However, after seeing how it would look like, I feel like the piece then be really full, crowded, loosing its own message of translucent piece of fabric..


I am still playing and making use of the button function to attach the piece on top of the garment, and this is an edit on how I visualize the piece when is sewn for longer piece together in one size of the body
This is another edit of if the piece is much more longer, and make it symmetrical on the body. Other than aiming this silhouette, as the help of button attached on several part of the dress, the wearer can actually play with the placement of the piece.
Tucks and Smocking Manipulation
Research on Tucks and Smocking Manipulation


Materials needed:
1. Plain medium weight woven fabrics- 6pcs in A3 size
2. Embroidery threads and needle
3. Scissors
4. Pencil, eraser
5. Drafting ruler
Experiment
1
Lattice smocking


This is the pattern to form a lattice smocking. First, I measured for about 2,5 cm dots for each vertical and horizontal line, write the number accordingly and follow the steps that the pattern has for pulling, and stitching the number

As this is my first time doing smocking, it was very challenging because as I always pull accordingly and vertically, when I continue to another row then I could not really see the dot as it was pulled towards the previous smocking.

As for the result, I was actually quite satisfied of it though there was a small part on the top right of the smocking was not perfectly stitched (you can see it on the picture).
Through this first experiment, I learnt that putting all concentration on remembering which dots/ parts that I just sewn is really important. Because if there were any mistake on poking the point where the needle goes through and already pulled, then we might need to start to do the smocking from the very beginning. Other than that, I find that the edge of the smocking is more interesting, as it then forms another details that looks like a wave on the ocean
2
Lozenge smocking


I find that the pattern of Lozenge smocking is more simple than Lattice, because we can see clearly on where we should poke and stitch, up and down, clearly as it was then formed after we pull the whole thread altogether during the last stage. Here, I should have put a shorter gap between each rows and more stitch of the column, so that the pattern could be shown better.

Even though that it was very easy for me to stitch the thread, pulling them at the end to form the illusion was very challenging. The reason why is because I need to pull every thread at once, while also grabbing the result of pulling fabric vertically. Eventually, I even need to ask another person to hold it for me while I pulled the thread. After several attempt, then the square pattern was formed together.
Looking at the result, I realize that for doing smocking, one must also be really cautious on choosing the right thread and right fabric based on the smocking pattern. Here, you can see that the white thread contrasts the blue, smocked, fabric, that then reflects towards untidiness of the smocking.
3
Flower smocking


This is the pattern to form a flower smocking. This time, I marked for about 3 cm dots for each vertical and horizontal line, write the number accordingly towards the pattern

In order to form a flower illusion embellishment, different than the rest, pointing at the right angle of the needle towards the next number of poking the fabric is very important. Even after finish forming the flower, we should also make sure that the circle tucks were distributed perfectly for each side.

This was a mistake that I did for doing smocking. I used a double thread that was very long, making the thread to have some bickering while I was trying to poking it at one of the dots. As consequence, then I cut the remaining thread and started to form the flower from the start.

This is the result of the flower smocking. After several experiment on smocking, I realized that this one is the tidiest one, since I was really trying to maintain the stability of pulling, turning the angle of the needle, and cutting the knot thread at every stage of forming the flower. At this stage, I learnt that for doing any textile manipulation, one must really keep the consistency of doing and finishing their work at every step.
This flower smocking, has the finishing edge that looks like ruffles. The result of it may not clearly depicted on my piece, however, because I should have sewn and form the flower more, and not cut the sample to be really close the smocking part, to really see the ruffles.
Artifact for smocking (edited picture):
Based on my exercise on doing smocking, I noticed that the edge of the manipulation then could produce another details that looks like a wave/ ruffles. Here, in attempt to make use of that, I was trying to visualize how the smock can be used for several artifact rather than just be put the embellishment in the middle of a dress, like how it looks line on my research.

What if the flower smocking was being put at the edge of the gloves? For the edge, of course there would be many additional ruffles/ fabric as the whole smocks were pulling them all. Instead of getting rid of it, I tried to rather make use of it as part of the additional ruffles for the gloves.

For Lozenge smocking, the illusion that it creates are forming a shape of rectangular, which if I were to sew it long together with elastic thread and connect them, it can also be then forming a tube top or an obi, perfect to be worn for summer.
Origami
Research on Fashion Designer who use Origami technique as their embellishment


Materials needed:
1. 2 Medium weight paper in A4 size
2. Ruler
3. Pencil
Experiment:
1
Herringbone

For preparing the whole piece, we fold the hole piece into 8 parts horizontally

We then fold a triangle shape at each 2 row form the top, and make sure that the slanted fold to always be connected to the horizontal fold

After finished to fold a triangle shape for every row, I made sure that every fold was joint and met together, with the same gap between one another
Final Result:

Then, I made it all 3 d by holding it with one hand, and push the fold from behind, column per column.

The point of making a herringbone origami is to make a pattern that is neatly parallel which in any two adjacent rows slope in opposite directions. In order to form this pattern in yarns are very easy. However, forming it in paper was quite a challenge because I really need to keep the gap between one row to another to be the same, checking all fold were all joint together, even the slanted one.
Fortunately, I used thick paper to form this herringbone origami pattern and I could really control the paper easier and divide each gap distributively and formed the zig-zag pattern successfully.
For aiming a hyperbolic pattern, I must precisely fold the paper accordingly. To continue to form another pattern, I just need to repeat the steps for folding it together.
2
Hyperbolic

To help me check whether I correctly fold the pattern or not, I tried to redraw the next row of pattern and also to get a better visual on how it should turned out to be like.


This is how the hyperbolic pattern should look like when already formed into 3D, pushing the folded part from behind the paper.
Final Result:

In order to form the hyperbollic pattern, at first, I found a lot of difficulties to discover and repeat the same method of folding because I could not imagine and understand about how the pattern should look like. But then, after doing the fold for about 4 times and redraw the next line of rows, it then really guide me to slowly comprehend about how each fold should be taken. During this stage I learnt that by practicing, even the hardest and most complex goal could be attain if we really have the urge and ambition to do it. Other than that, I also understand that patience is a really important aspect that a designer should own because in order to achieve this hyperbollic pattern, I also repeatedly fold the paper wrongly and re-fold it again, making the paper to almost be ripped.